Germinating cannabis seeds is the first step to a healthy grow. Proper germination ensures strong roots, prevents disease, and maximizes the chance of survival. This guide is suitable for beginners and experienced growers, explaining both the how and the why of each step.
Important: Check your local laws regarding cannabis cultivation. This guide is for educational purposes only.
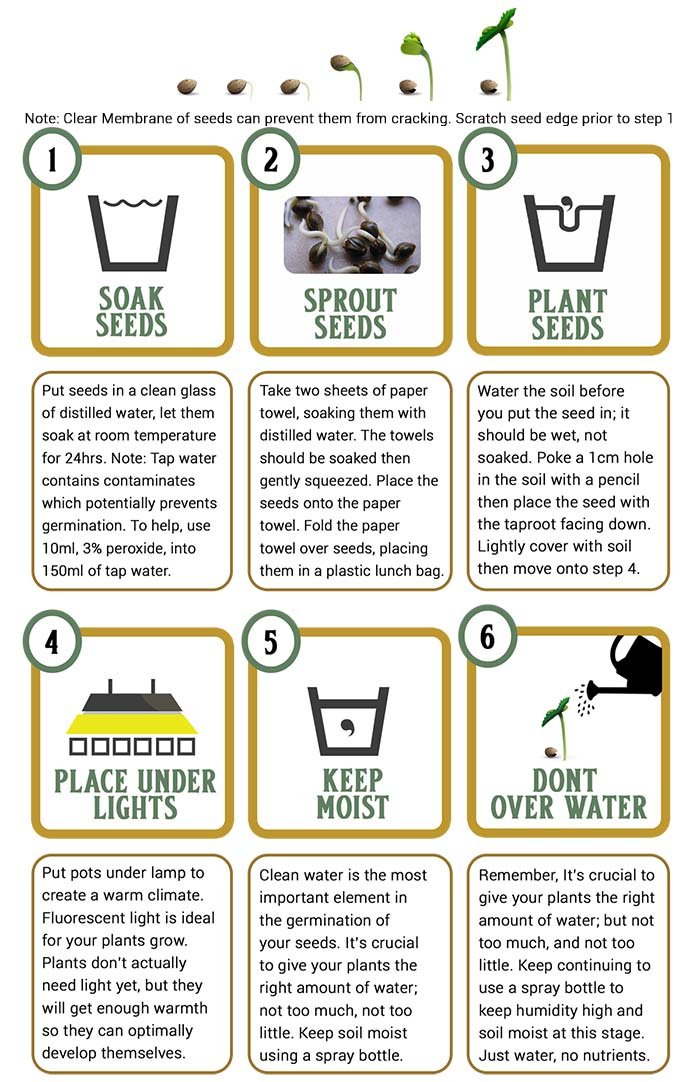
Purpose: Hydrates seeds, activates enzymes, and prevents bacterial or fungal growth.
Place seeds in a small container of room-temperature water.
Add 20 ml of 3% hydrogen peroxide to 180 ml of lukewarm water (1:10 ratio).
Why: Hydrogen peroxide provides oxygen and kills surface bacteria without harming the seed.
Soak seeds for 24–30 hours.
Gently tap seeds down if they float. Floating is normal.
Check for a small white tap root.
If visible, proceed to Step 2.
If not, continue soaking or move to Step 2 anyway — germination can still occur.
Tips:
Water pH: 5.8–6.8 is ideal.
Use distilled or clean rainwater. If using rainwater, peroxide is especially recommended.
Purpose: Provides controlled moisture and oxygen while preventing rot.
Place seeds on folded, white, dye-free paper towels.
Lightly dampen with water — do not soak. Too much water can cause rot.
Cover with a plastic bag or place between two small plates.
Seeds need humidity to stay alive but also oxygen to metabolize and grow. Too wet or sealed environments can suffocate them.
Mold appears → paper towel too wet or stale air; remove excess moisture and improve airflow.
Purpose: Darkness and warmth trigger the seed to break dormancy and sprout.
Place the paper towel in a warm, dark location (20–25°C ideal).
Check after 48–72 hours.
Wait until the tap root reaches 5 mm or longer.
The tap root (radicle) is the first organ to emerge and will develop the seedling’s root system.
No growth after 1 week → check temperature, moisture, and oxygen.
Tap root is brown → possible rot, likely caused by excess water.
Purpose: Transfers germinated seeds to a medium that supports root growth while protecting the fragile stem.
Carefully transfer the seed — avoid touching the tap root.
Plant in a slightly moist, additive-free medium:
Washed coco coir
Rockwool
Organic potting mix without fertilizers or additives
Water around the edges of the pot, at least 2 cm away from the seedling, to prevent damping off.
Use a humidity dome (or plastic bag) and lightly mist to maintain air moisture.
Seedlings absorb most water from humidity in the air, not from soil at this stage.
Overwatering is the most common cause of stem rot.
Seedling bends → not enough light.
Stem collapses → damping off; keep soil drier.
Purpose: Prevents contamination and ensures healthy germination.
Always use clean hands, containers, and water.
If using rainwater, add 20 ml of 3% hydrogen peroxide per 180 ml water; pH should be 5.8–6.8.
Avoid potting mixes with:
Fertilizers
Trace elements
Wetting agents
Water crystals
Growth stimulators
❌ No Jiffy pellets
❌ No imported brick coco coir (high risk of fungus)
Light & airflow:
Keep seeds dark until sprouting.
Provide cool light after sprouting.
Ensure airflow to prevent mold.
Most seeds sprout in 3–7 days.
Rarely, some take up to 2 weeks.
If no germination after 2 weeks, reassess conditions or try new seeds.
No germination warranty after 3 months.
Ideal storage:
5–10°C, sealed, low humidity
Fridge or climate-controlled room
Vacuum sealing is very effective
Overwatering
Using fertilized or additive-rich media
Touching the tap root
Exposing seeds to light too early
Poor airflow or stale environment
Water: Activates enzymes and swells the seed.
Hydrogen peroxide: Adds oxygen and prevents microbes.
Humidity: Seedlings absorb moisture from the air before roots fully develop.
Darkness: Triggers germination, preventing premature light stress.
Clean environment: Reduces disease risk and improves survival.
Hydrogen peroxide (H₂O₂), when used in low, properly diluted concentrations, has been shown to support seed germination by improving oxygen availability and reducing microbial contamination on the seed surface. As hydrogen peroxide breaks down into water (H₂O) and oxygen (O₂), it increases dissolved oxygen levels around the seed, which supports early metabolic activity required for germination.
In addition to its oxygenating effect, hydrogen peroxide helps weaken the outer seed coat, allowing water to penetrate more efficiently. This is particularly beneficial for seeds with harder or less permeable shells, where water uptake may otherwise be restricted. By reducing surface pathogens such as fungi and bacteria, hydrogen peroxide also lowers the risk of seed rot during the critical early stages of germination.
When applied correctly, hydrogen peroxide does not act as a fertiliser or growth stimulant but rather as a supportive agent that enhances the conditions necessary for germination. Excessive concentrations or prolonged exposure, however, may damage seed tissue and reduce viability. For this reason, only low-strength, diluted solutions should be used.
In conclusion, diluted hydrogen peroxide can be an effective tool for improving germination success, particularly in seeds with hard coatings or when sanitation and oxygen availability are limiting factors. Proper concentration, exposure time, and handling are critical to achieving positive results without compromising seed health.
Although we provide a service to many countries where cannabis seed germination and or cannabis cultivation is legal. In Australia, the cultivation, germination, and manufacturing of derivative products from cannabis seeds is, unless a license is obtained, illegal.
You must ensure that you familiarise yourself with your local state laws before making any purchase. Mediseed Man takes no responsibility for purchases made without the proper understanding of laws and regulations that apply to the purchasing party.

2026 2 March
Picture a modern Australian evening: a cork twists from a wine bottle, a jar clicks…

2026 28 February
This paper contributes to the sensory analysis of wine and cannabis by examining their shared…
2026 27 February
If you’re asking, “Which cannabis seeds can I legally buy in Australia, and why does…